
 |
| Bose Triport Tactical |
I got my US Army Bose Triport Tactical headset on eBay from a very nice man in selling army surplus. From the start I knew it would ask a little trial and error to understand the pinout of the AP-107 connector (or more precisely the AP-107BR, specs here) since all I could find were the connector specs not its pinout but I was still far from expecting what follows...
A broken headset with only one ear working
Since it was not working as it should, the seller from eBay kindly suggested to refund me. Since I had nothing to lose anymore I took it appart and tried to fix it. Here is how I did it:
- Checked all the wires with a multimeter. This is the first thing to do: you unplug wires on both sides and check for broken ones. All connectors were glued with transparent silicone (which is easy to remove): it did not work.
- Opened the headphones and the control box to look for burned components (visual inspection): no luck neither.
- Cross checked the noise cancelling circuits and speakers by plugging the left ear cup noise cancelling circuit on the right ear cup speaker and ... bingo !
The right earcup speaker was not working with the left earcup circuit, simply meaning it was not working.
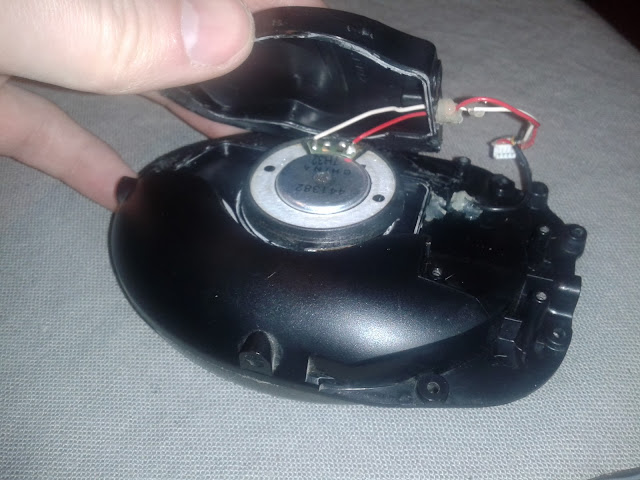
Opening the ear cup
Remove the mic (or the plastic cover) and unscrew the noise cancelling circuit
First, unscrew the mic (or the plastic cover, if you're working on the other side) and disconnect the cable going to the battery compartment. You then need to remove the three screws on the other side of the ear cup. This will give you access to the noise cancelling circuit.
From there, you will need to remove the silicone glued to the connectors to detach them. You can then disconnect all connectors (except maybe the for the cable going to the other ear cup). You now need to remove the noise cancelling circuit before opening the ear cup and replacing the speaker.
Replacing the speaker
 Detaching the speaker from the metal frame of the headset is esay. You need to slightly bend the metal (don't worry, it will keep its shape).
Unfortunately the (defective) speaker is trapped inside a glued encasing and it is not meant to be serviced. You can however break it open, and if you do, I recommend you to use a small flat screwdriver (see picture on the right) to force it open.
Note: you will need to use a lot of force to break the glued plastic. Starting from the lower right corner is the best place to start as you will make a dent there and this place is hidden behind the noise cancelling circuit.
Once open, you will need to remove the broken speaker (which is also glued to the plastic casing.
 |
| The original speaker still glued to the ear-cup |
 |
| Removing the old speaker watch the red dot for + |
Once you removed the old speaker, and soldered the wires to the new one (polarity !), make sure you glue the new one properly. You actually need to make sure the glue completely seals the front from the back. I personally used hot glue.
I used a speaker from an old pair of headphones with a broken cord. If you do this as well, you should be careful not to break it. I learned it the hard way using my screwdriver as a lever.
 |
| New speaker salvaged from an old pair of headphones |
If you want a good sound insulation, you'll want to seal back the earcup (with e.g. hot glue). You can then reassemble the whole thing and enjoy your headset.
Lessons learned
This investigation led me to make two discoveries:- These headphones are not stereo, as-is they only have a single audio channel on the connector that is sent to both earcups. This perfectly makes sense since they were designed to work with vehicle radios.
EDIT: These headphones can however be adapted to become stereo. You can find out to procedure here.
- Headphone speakers are not serviceable ! The cup is glued and you cannot take them apart to swap the speaker with a working one (the same goes for the microphones).
- These headphones have a very particular behaviour. They do not prevent you from hearing ambient noise, they instead regulate the volume so it remains within a safe range. You can read my review of the Bose Triport Tactival headset for more info. There is however an Active Noise Reduction (ANR) functionality that is active only when in a vehicle (read how to work around that)